
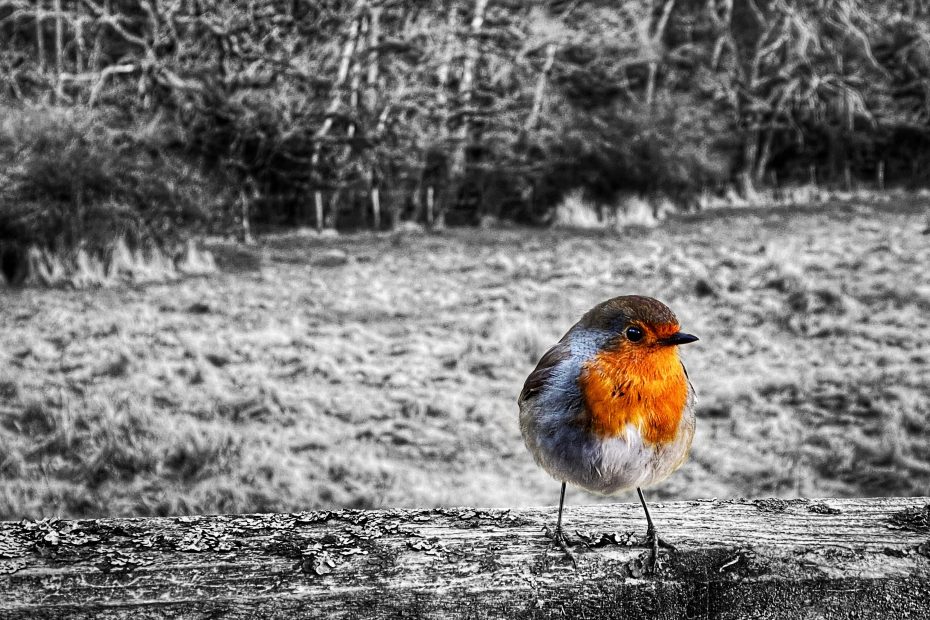
In my last article, we looked at post editing your photos, but we looked at either full colour images or converting to full black and white. For this article, we will look at something that is popularly called ‘colour pop’, or selective colouring of an image. By this I mean making a black and white image, but retaining a small selective part of the image in its original colour to give a pop of colour and draw the eye to something special in the shot. This is far easier these days, with digital photography, where almost everything is shot originally in full colour, rather than using black and white film. This technique can be used if you shoot on black and white film, but it will involve a coloured ink/paint being painstakingly painted onto a print. We will not go into that here; instead, we will be focussing on digital creation of a ‘colour pop’ image. To see what I mean by ‘colour pop’, there are examples alongside this article. It can be used to great effect if done well, but it can also be done badly or incorrectly and spoil a good image. Use the technique sparingly and in the right way, and you can have a very creative shot with loads of impact.
So, first you need the right shot to work with. The colour that is most commonly, and most effectively ‘popped’ is Red which looks great in a black and white image, but you needn’t restrict yourself to just Red. A good primary colour like Red, Blue or Yellow works best though, although as long as it’s a strong colour you’re good to go. Firstly, you need to shoot the right shot for a colour pop image. Look for a burst of bright colour in your scene, and then position it correctly in the frame. Look back to my composition article if you need a reminder, (the rule of thirds will help). Sometimes, you can get lucky with your burst of colour. Someone wearing a red coat may walk into your shot, or just happen be where you want them to be. Or, you may have a partner or friend with a bright coat or umbrella that you can ask to stand in your shot in a strategic place. (Yes, my wife has come in handy many times!) … Umbrellas and other props are great for colour pop too! Consider too, using colour pop on the eyes of a bird, animal or a person!
So, you have your shot with your brightly coloured part that you want to use to create a colour pop image. What next? Well, there are numerous ways to do this using various apps or software. Some options are the classic Adobe Photoshop, Adobe Lightroom, or you can use colour pop apps such as Colorsplash, (there are many to choose from), or you can do it with Snapseed too (which I often use). Some apps will automatically selectively colour your image for you, but beware, you don’t have much control, and you may get more popped than you want! If you choose to use Photoshop, and are competent with it, it’s quite easy. You will need to create a duplicate layer of your image, turn the top layer to black and white, and then with the eraser tool, simple erase through the black and white layer of the part you want to colour and you will see the colour in the layer beneath. Then combine the two layers together. If you want to use Snapseed, (I talked about this App in my editing article), then firstly, edit your colour shot as you want it and save it. Next, reduce the saturation level to zero. This will make your shot black and white. After this, go to the ‘view edits’ tab and you will see the last thing you did highlighted in blue. If you click that, you get a brush option, click on that. This will allow you to brush over the part you want to keep in colour. Brush over it, you are actually masking the part from the black and white conversion process, and then invert it using the icon at the bottom. Click the arrow at the top left and you have your colour pop.
Remember! Take your time and be careful with your outline. A successful colour pop should have good, well defined edges and only the bit you want coloured should be colour! You can always de-saturate any bits that are wrongly coloured later but it’s better to do it right first time! As always, practice makes perfect. However you choose to do it, until next time, pop away and give it a try, and see what you can do. Above all, enjoy your photography.